I love light/dark mode options on sites, if you like exploring colour palettes and different tones, you’ll know how much fun they are to play around with. Most developers have a favourite colour theme for their code editing environment, (mine changes almost daily). Which is why when it came time to design the new Lionize site, I knew I wanted a dark/light mode option, but once I started implementing it, the design quickly spiralled (some would say out of control 😄 ) into its current manifestation of 5 colour themes for the user to choose from. This works well for our branding, but to scale it back for this tutorial we will focus on how to implement a basic light/dark mode in Webflow that persists when the user navigates to different pages on the site.
If you’re interested in following along in person with the full detailed build, then please watch the video tutorial.
Client-First
I love the client-first model, and even though this build has a substantial amount of custom code, I really wanted to keep it as client-friendly as possible.
Build up the UI and create the colour classes
1. So to start, clone the Finsweet Client-First starter template. Delete their message component, so you’re left with a blank site:

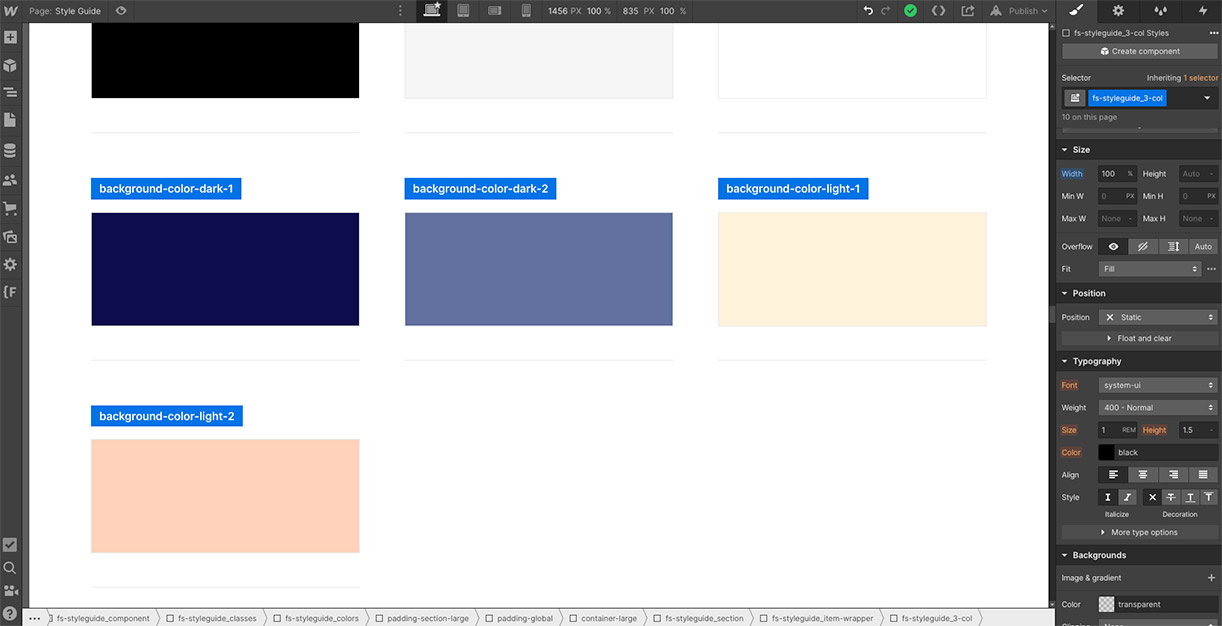
2. In the “Style Guide”, scroll down to “Text Colors” and “Background Colors”. We are going to control our light/dark modes using classes, so we will define these now. We are going to create the following classes:
- background-color-dark-1
- background-color-dark-2
- background-color-light-1
- background-color-light-2
- text-color-dark-1
- text-color-dark-2
- text-color-light-1
- text-color-light-2
3. Copy & paste the last fs-styleguide_item in both lists four times.

4. Then change the labels, delete the class and add the new classes to each element.


5. Now click into each class and add whatever background & text colours you want for your light/dark modes. Here are the values I used:
- background-color-dark-1 - #0d0c4c
- background-color-dark-2 - #6271a0
- background-color-light-1 - #fff2db
- background-color-light-2 - #ffd2ba
- text-color-dark-1 - #6271a0
- text-color-dark-2 - #c0cfff
- text-color-light-1 - #ff9900
- text-color-light-2 - #ac2f26

6. With that done, we have the basis of our themes complete, now we need to build out the UI.
Back on the Home page, add the following structure inside the “main-wrapper”.


I won’t go through the design specifics here, I cover it all in detail if you want to follow along on the video. The svg arrow is from the awesome Lucide open source collection.
7. Now I’ll build the Switch component. I’m going to build this from scratch. It has the following structure.

8. Set the section_hero-home position to relative, and the switch_component position to absolute, and place it in the upper right hand corner. Then create the basic shapes of the switch.
9. First to give it some space we’ll give the switch component a width of 400px and a height of 200px.
10. Then we’ll make it Display: Flex and centre the elements inside it.

11. For the switch itself, give it a width of 120px and a height of 60px, again set it to display: Flex and align: centre, but this time justify: left. At this point we are also going to set the background for the switch.
12. We’ll design the light mode first, so I’ve uploaded a beautiful sunrise image and I’ll add that as the background image on the switch. Set the background image to “cover”.
13. Then add a border radius of 60px.
14. At this point, your switch should look like this:

15. Now we’ll style the circle. Give it a width and height of 45px. A margin-left of 6px and a border-radius of 50%, give it any temporary background colour you want, just so you can see it, and we’ll also give it a box shadow with whatever settings you’d like. Here are mine:

16. So now, your switch should look something like this:

17. Change the text on the headings to whatever you want. I’ll go with “Welcome to the light” and “There are many paths to the same goal” and for the link text “Show me the way”. Change the font, I’m using Montserrat Extra Light, 5 rem for the main heading. Montserrat Light at 2rem for the subheading and Montserrat Normal at 1Rem for the link text. Also get rid of the nasty link underline, by clicking the X option on the link block Decoration property.
18. Make the “hero-home_heading-wrapper-inner” element Display: Flex and centre aligned and justified. I also added some descriptive classes to the remaining unnamed elements like so:

19. The site should look like this:

20. Now we’ll start adding light mode colour themes to the rest of the page.
21. Add the class “background-color-light-1” to “section_hero-home”.
22. Add the class “text-color-light-1” to “dark-light-heading”
23. Add the class “text-color-light-2” to dark-light-subheading”
24. Add the class “text-color-light-2” to “link-text” and to “svg-arrow-to”
25. Reset the colour from the switch circle and then add the class “background-color-light-2” to the “switch-circle”
26. Now let’s build up the link into more of a button style. Give the “link-wrapper” an all sides padding of 11px, give it a border-radius of 50px and then add the class “background-color-light-2”.
27. If you need to adjust any of the elements that already have the new colour classes attached to them, be careful not to adjust on top of the stacked classes. You will have to remove the colour class and then adjust and then re-add the colour class, otherwise you will have css rules attached to the wrong classes.
28. So for instance to adjust the centering of the “Show me the way” text inside the button, we have to delete the “text-color-light-2” class and only then change the text line-height to 1.6- and then we can re-add the “text-color-light-2” class.
29. Apply the same principle to finish styling the elements. First add a top-margin of 1Rem to the “dark-light-subheading”.
30. Then add a top-margin of 1.5 Rem to the “link-wrapper”.
31. Congrats the first part is done. Your page should look like this:

Add Attributes
1. Now we are going to add attributes to all the elements that we will be targeting for the mode change. We only need to add the text into the attribute “name” field. Leave the value empty.
Here are the classes and the attributes to add based on those classes.
In practice this means adding the following attributes to these elements.
Remember only add the text to the attribute name field.

2. Add the ID of “modeSwitch” to the “switch-circle” element. We could target the class, but I prefer to use IDs for custom JavaScript triggers.
3. Add the ID of “heading1” to the main heading.
JavaScript
This part assumes some JavaScript knowledge, you can code along verbatim and it will work, but I will assume you understand how variables, event listeners and functions work.
1. This code will eventually go in the project page settings, but for now, write it in the page custom code box as it will be easier to test that way.
2. Start by adding two <script> </script> tags to the “Before </body> tag” custom code box.
3. First let’s add a variable selector for the switch-circle that will later be used with an event listener:
4. Now we’re going to create variables for all the page elements we’ll be targeting. We added all those attributes to give us an easy way to select them all with JavaScript, which we will do like so:
This code creates four arrays filled with all the elements with each of the selected attributes.
5. Now create the variables associated with changing the switch button’s background. Firstly the switch button itself:
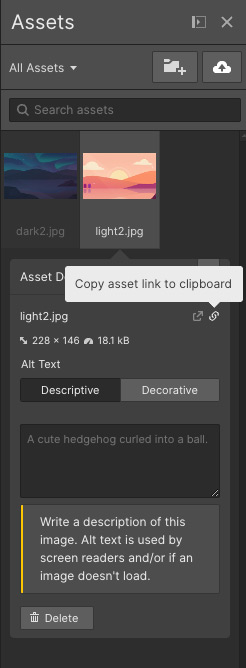
6. Then we want to grab the url links for each of the switch button image backgrounds. Both of which have been uploaded into the Webflow assets library. So go to the library and copy each link like so:
7. Now create variables for two headings:
(We will be adding the second heading later).
Local Storage
We are going to use Local Storage to ensure that the colour changes persist when the user navigates from page to page. localStorage is a property on the window object that allows us to save key-value pair data in the browser and that data will persist, even after the window is closed. We are going to use two localStorage properties to achieve this: setItem() & getItem()
Our local storage key to base the mode on, is going to be called “mode” and its value will be either “light” or “dark”.
1. Now when the page loads first, there will be no localStorage and no mode set, so that is where will start. Under the element variables, write the following:
This is basically, asking the browser to look and see if the “mode” key is equal to null (there is nothing set) and if so, set it to ‘light’ as light will be our default mode.
2. Now let’s create a click event listener on the switch.
So if the user clicks on the switch element, the local storage mode will be changed to ‘dark’ or ‘light’ depending on what it was. We can test this by publishing the site and opening the console. I’ve also added some temporary console.logs so you can see the effect the switch is having as you click.

Likewise, on Chrome, if you click on the “Application” tab and then under Local Storage, select the url shown below, you can watch the mode value change as you click.

Style Changes
1. Let’s start the style changes by changing the switch background image from light to dark. Inside the if statement, add the following:
These lines use template literals to use the variables for the light / dark images we created earlier inside the backgroundImage property to change the url, and thus the image, as the mode is changed.
If you publish and test it, the switch background will change as you click.
2. Now we are going to create a function that takes care of the rest of the style changes. We will place this function just after the variable definitions and before the if statements.
This is a lot to take in at once, but basically the function takes 4 parameters which represent the classes we want added to the page elements. In the above function those classes are abstracted into the parameter names, but they will be real classes when we call the function.
Let’s take the second section to look at:
'backgroundColor2Elements' is an array containing each of the elements on the page with the attribute name of ‘bg-col-2’. This code then loops through each element in that array and cleans it of all colour classes. It takes the classList and removes both dark and light background-color-2 classes. Then it adds the class represented by the parameter name ‘backgroundColor2’ - this will be either ‘background-color-light-2’ or ‘background-color-dark-2’, but by abstracting it, we can use this function more flexibly.
The rest of the function does the same thing for each of the class categories: text-col-1, text-col-2, bg-col-1 & bg-col-2
3. Now that we’ve defined the function, let’s apply it to the page, let’s also remove the console.logs as we have enough visual proof that the code is working now.
If you publish and preview this and then hit the switch a few times, you will see that it works. But how is it working? When the mode is changed to dark, the changeStyles() function takes in the classes we want to apply, which are the selection of dark classes. The function then does everything we discussed above and at the end applies those specific classes to each of the targeted elements.
Animating the switch
Let’s make the switch work more like a switch.
- Select the “switch-circle” element and click on the Webflow Interactions tab.
- Click the + to add a new “Element trigger” - add a Mouse Click (tap) trigger
- “On 1st Click” - “start an animation” and click the + to create a new Timed Animation. Give it a name - “Switch Click 1 Animation” for instance.
- Leave the Affect: option to “Interaction Trigger”
- Add a “Move” action, set it as initial state, and set all the coordinates to 0.
- Duplicate that action, leave the duration at 0.5, and set the x-coordinate to 60px, set the easing to “Out Bounce”.
- Save that Animation and now add one “On 2nd click”
- Duplicate the first animation and then go in to edit the duplicate:

- Delete the second Move action.
- Uncheck the “Set as initial state” box on the remaining action.
- Set the easing to “Out Bounce”.
- Publish and test. It should work nicely.

The second page
Now since we want this functionality to work across an entire site, we need to create a second page to see how it works.
1. Duplicate the home page and give it another name, I have gone with the uber original “page2”.
2. All the styles and custom code will be identical on both pages, but now when we edit the custom code on one page, we have to remember to copy it over to the second page, as ultimately we will be moving that code to the page settings custom code area.
3. To start, let’s change all the text on the second page. Change the main heading to “The light travels” and change the subheading to “And meets you on the next page”. Change the link text to “Show me the way back”
4. Change the ID of the main heading from heading1 to heading2.
5. As a quick arrow hack, remove the “text-color-light-2” class from the svg arrow, and then duplicate the svg class name, change the class name to “svg-arrow-from”. Now click + next to 2D&3D transforms and rotate the arrow’s y-coordinate by -180deg.
6. Add the “text-color-light-2” class back to the arrow.
7. Then in the navigator move the arrow so it sits above the link-text.
8. Let’s also now connect the links on both pages, so we can navigate.

9. Your second page should now look like this:

If you publish and navigate between the two pages, you will notice that the mode switcher is working badly. This is because we need there to be a check for the mode when any new page loads first, not just when the switch is clicked. Otherwise when a user navigates around the site, the mode style changes won’t be applied.
Persist the Modes
1. On page load we want to run the same structure ‘if’ statement as our switch, but we need it to apply the opposite logic: if a new page loads and the mode = “light”, then we want our light styles applied. Whereas with the switch the logic is if the mode = “light”, apply dark styles. We are also not going to change the mode on page load.
This if statement will sit in the script without being attached to an event listener, therefore the browser will evaluate it on each page load. If we save and publish
2. If you publish and test, you’ll see that the light and dark styles are persisting! Brilliant. The full custom code (that needs to be identical on both pages) now looks like this:
3. This is now a working light/dark mode website, but we’re going to add a few more changes to finish up.
Polishing the code
1. Let’s add the final flourish of changing the heading text depending on whether we are in light or dark mode.
We’ve targeted and changed the textContent property of the heading element, based on whether we want it to be ‘light’ or ‘dark’. We also have to wrap the rule in an if statement, because on the second page, the first heading is not present and on the first page, the 2nd heading is not present. Without the if statement, an error will be thrown.
That’s it, well done if you’ve gotten this far. I hope this tutorial has proven useful for many of you and if nothing else, you can use the cloneable as the basis for your own light/dark modes.
I should also say there are many other ways of achieving this effect, but this to my mind was the most logical method, particularly within the Webflow / “client-first” framework. The loops and attributes mean that you can keep adding elements you want to be affected by the light/dark mode and the same code will work for all of them.
Here is the final code, which you can now cut from the page custom code area, and paste into the main project settings custom code area.